The article describes CMS Drupal deployment, as being performed with the use of Oracle DB and with Debian server employed. Thus, at our disposal we have Debian X64 operating system, nginx web server and php-fpm back end server which is geared toward handling the PHP scripts. A good many of articles have described Nginx + php-fpm server deployment routine, hence there's no need to fix on it for long, and we shall directly proceed to preparing the Oracle DB installment. First, a Drupal developer will need to install the whole number of PHP modules that we may require:
# apt-get install php5-mysql php5-curl php5-dev php-pear php-db php5-gd php5-idn php-pear php5-imagick php5-imap php5-mcrypt php5-memcache php5-ming php5-ps php5-pspell php5-recode php5-snmp php5-sqlite php5-tidy php5-xmlrpc php5-xsl
# /etc/init.d/php5-fpm restart
As long as we have used Debian Based ОС, RPM packages, the standard installation routine, thus and so, will not work out. Hence, we will make use of Alien utility in this case:
# apt-get install alien
We next proceed to the libraries we require:
# apt-get install libaio1 unixodbc
As to core parameters, we work them out as follows: we create /etc/sysctl.d/60-oracle.conf file which contains:
fs.file-max=6815744
net.ipv4.ip_local_port_range=9000 65000
kernel.sem=250 32000 100 128
kernel.shmmax=536870912
And then we get the following command running:
# service procps start
On top of this, for we are dealing with Debian operating system, it seems that we are in need of a catalog to keep the database and the client:
# mkdir /home/oracle-xe
# ln -s /home/oracle-xe /u01
Next, we take up the Oracle DB installation, proper. We have to primarily download zip archive Oracle Database Express Edition 11g Release 2 for Linux x64 right away, which can be accessed at www.oracle.com. Then we do the unpacking, which is to be followed by cleaning out the wastes (mind that the version of your package may differ!) :
# unzip oracle-xe-11.2.0-1.0.x86_64.rpm.zip
# mv Disk1/oracle-xe-11.2.0-1.0.x86_64.rpm ./
# rm -r Disk1
We are creating the package with the help of Alien utility:
# alien --to-deb --scripts oracle-xe-11.2.0-1.0.x86_64.rpm
At this point we are in lack of /sbin/chkconfig file in the Debian system, which is required to support the installer, this type of file, thus, should be created and should contain the following:
#!/bin/bash
# Oracle 11gR2 XE installer chkconfig hack for Debian based Linux (by dude)
# Only run once.
echo "Simulating /sbin/chkconfig..."
if [[ ! `tail -n1 /etc/init.d/oracle-xe | grep INIT` ]]; then
cat >> /etc/init.d/oracle-xe <<-EOM
#
### BEGIN INIT INFO
# Required-Start:     \$remote_fs \$syslog
# Required-Stop:     \$remote_fs \$syslog
# Default-Start:         2 3 4 5
# Default-Stop:         0 1 6
# Short-Description:   Oracle 11g Express Edition
### END INIT INFO
EOM
fi
update-rc.d oracle-xe defaults 80 01
We supply the launch admission:
# chmod 755 /sbin/chkconfig
Incidentally, we shoud configure out the compatibility with Debian system:
# ln -s /usr/bin/awk /bin/awk
# mkdir /var/lock/subsys
Next, we proceed to installing Oracle DB (in the event of conflict of the following file configuration /etc/init.d/oracle-xe we should opt for “install the package version” [Y]) :
# dpkg --install ./oracle-xe_11.2.0-2_amd64.deb
Setting up Oracle:
# service oracle-xe configure
We enter the web interface port number, database port number and the password which the user of SYSTEM database will require.
We set the password for Oracle system user:
# passwd oracle
We set the HOME directory for Oracle user:
# cp /etc/skel/.bash_logout /u01/app/oracle
# cp /etc/skel/.bashrc /u01/app/oracle
# echo '. /u01/app/oracle/product/11.2.0/xe/bin/oracle_env.sh' > /u01/app/oracle/.profile
# chown -R oracle:dba /u01/app/oracle
To set up the correct SID, we make the file /u01/app/oracle/product/11.2.0/xe/network/admin/tnsnames.ora look like follows (you set the “PORT” value to one of your own):
# tnsnames.ora Network Configuration File:

XE =
(DESCRIPTION =
 (ADDRESS_LIST =
   (ADDRESS = (PROTOCOL = TCP)(SERVICE=XEXDB)(HOST = 127.0.0.1)(PORT = 1521))
 )
 (CONNECT_DATA =
   (SERVICE_NAME = XE)
 )
  )
While /u01/app/oracle/product/11.2.0/xe/network/admin/listener.ora should look like (you should replace “PORT” and “HOST” values for your own, and mind that “HOST” should stand for the hostname, not the IP address):
# listener.ora Network Configuration File:

SID_LIST_LISTENER =
  (SID_LIST =
 (SID_DESC =
   (SID_NAME = XE)
   (ORACLE_HOME = /u01/app/oracle/product/11.2.0/xe)
   (PROGRAM = extproc)
 )
  )

LISTENER =
  (DESCRIPTION_LIST =
 (DESCRIPTION =
   (ADDRESS = (PROTOCOL = IPC)(KEY = EXTPROC_FOR_XE))
   (ADDRESS = (PROTOCOL = TCP)(HOST = debian)(PORT = 1521))
  )
  )

DEFAULT_SERVICE_LISTENER = (XE)
Besides, the environment variables need to be adjusted, as they are not set up at the moment of package installation. For this, we add the following strings into /etc/environment file:
ORACLE_BASE=/u01/app/oracle
ORACLE_HOME=/u01/app/oracle/product/11.2.0/xe
TNS_ADMIN=/u01/app/oracle/product/11.2.0/xe/network/admin
ORACLE_SID=XE
LD_LIBRARY_PATH=/u01/app/oracle/product/11.2.0/xe/lib
NLS_LANG=AMERICAN_AMERICA.AL32UTF8
Then we perform installation of the variables for $PATH environment as meant for the users who have been granted the access to sqlplus:
# echo 'PATH=$PATH:/u01/app/oracle/product/11.2.0/xe/bin' >> ~root/.bash_profile
# echo 'PATH=$PATH:/u01/app/oracle/product/11.2.0/xe/bin' >> ~oracle/.bash_profile
As it is, the file admission status should be set up correctly to the /u01/app/oracle/product/11.2.0/xe/bin/oracle file, or else an error message will be thrown up at the moment of sqlplus authorization “ORA-12547: TNS:lost contact”:
# chmod 6751 /u01/app/oracle/product/11.2.0/xe/bin/oracle
Afterwards, we perform the server reboot and try logging in the sqlplus console:
# reboot
(Important! The download having been done, 502 Bad Gateway error may pop up the moment the page is accessed. That requires rebooting php-fpm: # /etc/init.d/php-fpm restart )
# sqlplus SYSTEM
At this point, Oracle DB set up is complete. The next step involves installing php PDO_OCI module which is crucial for Drupal and Oracle DB interaction. We, further, create a temporary directory to download Oracle instance client into. It can be tracked by the following link: https://www.oracle.com/database/technologies/instant-client/linux-x86-64-downloads.html, (here we need the foll. archives: instantclient-basic, instantclient-sdk, instantclient-sqlplus) and then we unpack them (mind that your archives' versions can differ):
# unzip instantclient-basic-linux.x64-12.1.0.1.0.zip
# unzip instantclient-sqlplus-linux.x64-12.1.0.1.0.zip
We should create symbolic links at this point, which will refer us to the required libraries:
# cd /u01/app/oracle/instantclient
# ln -s libclntsh.so.* libclntsh.so
# ln -s libocci.so.* libocci.so
# echo /u01/app/oracle/instantclient >> /etc/ld.so.conf
# ldconfig
# mkdir -p include/oracle/11.1/
# cd include/oracle/11.1/
# ln -s /u01/app/oracle/instantclient/sdk/include/ client
# cd /u01/app/oracle/instantclient
# mkdir -p lib/oracle/11.1/client
# cd lib/oracle/11.1/client
# ln -s /u01/app/oracle/instantclient lib
# ln -s /usr/include/php5/ /usr/include/php
We proceed to php_oci module downloading:
# mkdir -p /tmp/pear/download/
# cd /tmp/pear/download/
# pecl download pdo_oci
Now it's bieng unpacked:
# tar -xvzf PDO_OCI*.tgz
# cd PDO_OCI*
Now we have to patch the module. We write in config.m4.patch file which contains the following:
*** config.m4 2005-09-24 17:23:24.000000000 -0600
--- config.m4 2009-07-07 17:32:14.000000000 -0600
***************
*** 7,12 ****
--- 7,14 ----
if test -s "$PDO_OCI_DIR/orainst/unix.rgs"; then
PDO_OCI_VERSION=`grep '"ocommon"' $PDO_OCI_DIR/orainst/unix.rgs | sed 's/[ ][ ]*/:/g' | cut -d: -f 6 | cut -c 2-4`
test -z "$PDO_OCI_VERSION" && PDO_OCI_VERSION=7.3
+ elif test -f $PDO_OCI_DIR/lib/libclntsh.$SHLIB_SUFFIX_NAME.11.1; then
+ PDO_OCI_VERSION=11.1
elif test -f $PDO_OCI_DIR/lib/libclntsh.$SHLIB_SUFFIX_NAME.10.1; then
PDO_OCI_VERSION=10.1
elif test -f $PDO_OCI_DIR/lib/libclntsh.$SHLIB_SUFFIX_NAME.9.0; then
***************
*** 119,124 ****
--- 121,129 ----
10.2)
PHP_ADD_LIBRARY(clntsh, 1, PDO_OCI_SHARED_LIBADD)
;;
+ 11.1)
+ PHP_ADD_LIBRARY(clntsh, 1, PDO_OCI_SHARED_LIBADD)
+ ;;
*)
AC_MSG_ERROR(Unsupported Oracle version! $PDO_OCI_VERSION)
;;
We save the file and patch it:
# export ORACLE_HOME=/u01/app/oracle/instantclient
# patch --dry-run -i config.m4.patch
# patch -i config.m4.patch
Then we have the module compiled and installed:
# phpize
# ./configure --with-pdo-oci=instantclient,/u01/app/oracle/instantclient,11.1
# make
# make test
# make install
Php configuration file having been added, we get the module running:
# touch /etc/php5/fpm/conf.d/pdo_oci.ini
# echo "extension=pdo_oci.so" > /etc/php5/fpm/conf.d/pdo_oci.ini
# /etc/init.d/php5-fpm restart
You can check up whether php module works with use of info.php file. To achive this we create info.php file (For nginx it's /usr/share/nginx/html/) that contains the following:
<?php
phpinfo();
?>
Once finished, we start it running in the browser window http://host-ip/info.php (where host-ip will be changed for ІР addres or domain which points out to the server), and the activated modules should enlist pdo_oci .
If it's done, we can proceed to employing Drupal. First, tablespace should be created and gotten ready. That takes caution: sqlplus console takes no excuses:
# sqlplus SYSTEM
SQL> create tablespace drupal
2 logging
3 datafile '/u01/app/oracle/oradata/XE/drupal.dbf'
4 size 32m
5 autoextend on
6 next 32m maxsize 3072m
7 extent management local;
SQL> create user drupal identified by password (where password is user password)
2 default tablespace drupal
3 temporary tablespace temp;
SQL> grant unlimited tablespace to drupal;
SQL> conn sys/password as sysdba (password replace with password of user SYSTEM)
SQL> grant execute on dbms_crypto to drupal;
SQL> grant select on v_$sql_plan to drupal;
SQL> grant select on v_$sqlarea to drupal;
SQL> grant connect to drupal;
SQL> grant resource to drupal;
Tablespase is up and running, thus we can leave the sqlplus console (Cntrl+D). We move into the root of our site, say in the whereabouts of /usr/share/nginx/html/ (as the default one, Nginx server directory is being used)
# cd /usr/share/nginx/html/
In the event of any file therein, they are to be deleted:
# rm -r ./*
The recent Drupal version is to be downloaded, which can be accessed by reference on the site https://www.drupal.org/project/drupal (the version may differ):
# wget http://ftp.drupal.org/files/projects/drupal-7.23.tar.gz
We unpack the archive and paste the files into the root cataloge:
# tar -xzvf drupal-7.23.tar.gz
# cp -r drupal-7.23/* ./
Then we delete the archive and Drupal catalog which we don't need any more:
# rm -r drupal-7.23 drupal-7.23.tar.gz
We install the module which allows the cooperation with Oracle DB.
# cd includes/database/
# wget http://ftp.drupal.org/files/projects/oracle-7.x-1.12.tar.gz
We unpack and delete the archive we are no longer in need:
# tar -xzvf oracle-7.x-1.12.tar.gz
# rm oracle-7.x-1.12.tar.gz
# cd oracle/module/
# mv oracle/ /usr/share/nginx/html/sites/all/modules/
(we still define our path to the root catalog of Drupal)
We set up the correct file admissions:
# cd /usr/share/nginx/html/
# chown -R www-data:www-data ./
# chmod -R 750 ./
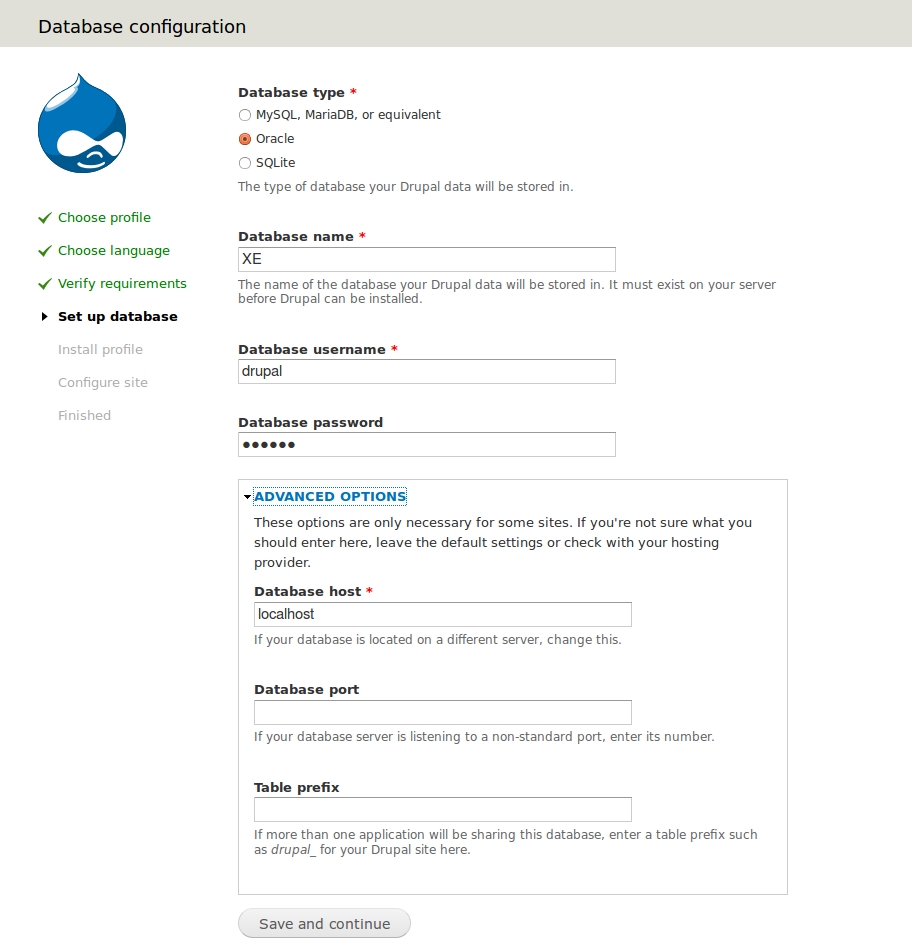
Finally, in the browser window. we activate the link leading to our future site http://host-ip/install.php (wherein we replace host-ip меняем with the ІР address, which points out to the server). One should keep in mind that the next step implies writing in “XE” into the “Database name” field, by no means tablespace, which has been created by us, whareas “Database username” the user proper (the one created by us) and not the “SYSTEM”. 
The remaining part of the installation process does not differ from the usual routine much: we enter data about the site and take up the next step. Now the installation is complete. We are in a possession of a ready-to-use Drupal package, which runs on Oracle.
