
If you are interested in the topic given below, you can read its extended version on this page of Drupal official site.
Here we will suggest an example of module realization as performed with the use of Field API in Drupal 7.
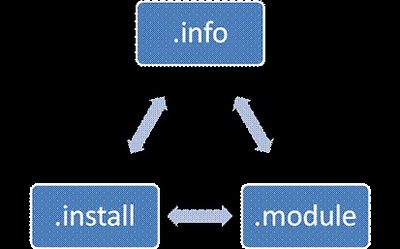
The most ordinary module that can show us the possibilities of Fields API should consist of 3 files:
So let's start.
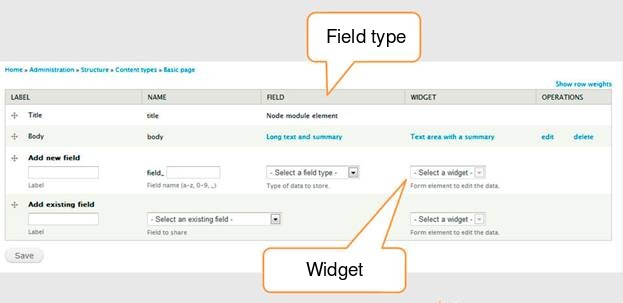
First of all we need clarification of some concepts that concern fields, field types and methods of formatting.
There are such notions as "Field type" and "Widget" and, incidentally, every field type contains a widget or several widgets.
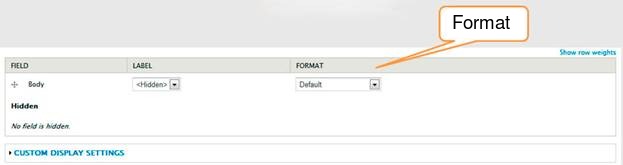
As we have checked Display Fields, we are suggested to specify the format of our field. Field format can be both single and multiple.
Let's create the module itself.
text.info file (in our case all files will be named textf) should contain the following lines:
// The name of our module.
name = Text field
// Description of our module.
description = A Simple Text Field for Drupal 7
// What section will our module be in.
package = public-action fields
// Drupal version in which our module will work.
core = 7.x
// File name with which our module will work.
files[] = textf.module
// Another file that we need.
files[] = textf.install
Pay attention to the lines below:
files[] = textf.module
files[] = textf.install
In Drupal 7, in each .info file, it's advisable to indicate the files that the module will work with.
Then we proceed to text.install file. It's responsible for creating space for our field in the DB.
/**
 * Implements hook_field_schema().
 */
function textf_field_schema($field) {
  // Return array that contains.
  return array(
    'columns' => array(
      // In column there is a textf field.
      'textf' => array(
        // Field has text type.
        'type' => 'text',
      ),
    ),
  );
}
We've just created the space for DB for it's in text that the text from our field will be placed into. For this, we are going to configure this field.
Let's work with textf.module.
/**
 * Implements hook_field_info().
 */
function textf_field_info() {
  // Returning array.
  return array(
    // Which is called textf.
    'textf' => array(
      // Name of our type will be 'Te(x/s)t field'.
      'label' => t('Te(x/s)t field'),
      // Description of our type.
      'description' => t('sample text field'),
      // Standart widget that will be dispalyed at once.
      // after that we choose field type
      'default_widget' => 'textf_widget',
      // Standart that will be dispayed right after we choose field type.
      'default_formatter' => 'textf_formatter',
    ),
  );
}

/**
 * Implements hook_field_widget_info().
 */
function textf_field_widget_info() {
  // Returning massive.
  return array(
    // With textf name.
    'textf' => array(
      // Our widget will be named textf label.
      'label' => t('textf label'),
      // Our widget will work with a field in DB under the name textf.
      'field types' => array('textf'),
    ),
  );
}

/**
 * Implements hook_field_formatter_info().
 */
function textf_field_formatter_info() {
  // Returning array.
  return array(
      // Name of our format for code.
      'textf_formatter' => array(
          // Dispalyed name of format.
          'label' => t('Simple text field formatter'),
          // Field in DB with which our format will work.
          'field types' => array('textf'),
      ),
  );
}
Then we set parameters for the widget. In other words, we are to create a field so as to insert our field into it.
/**
 * Implements hook_field_widget_form().
 */
function textf_field_widget_form(&$form, &$form_state, $field, $instance, $langcode, $items, $delta, $element) {
  // Setting switch into parameters that wll work widget types that are in module.
  switch ($instance['widget']['type']) {
      // If parameter case is 'textf'.
      case 'textf':
        // Then we assign to textf element an array.
        // With the following values.
        $element['textf'] = array(
            // Element type 'textfield'.
            '#type' => 'textfield',
            // Heading given in element settings.
            '#title' => $element['#title'],
            // Widget description is given in element settings.
            '#description' => $element['#description'],
            // Our widget will have standart value textfield.
            '#default_value' => t('textfield'),
            // If element is required it will be indicated in settings of the very element.
            '#required' => $element['#required'],
            // Element location –
            // If it's indicated, value should be used, if not, value is 0.
            '#weight' => isset($element['#weight']) ? $element['#weight'] : 0,
            // Line that we'll need for the output.
            '#delta' => $delta,
        );
      break;
  }
  return $element;
}
And the final step: we need to show to Field API what it should do if there's no text. That's how it can be done:
/**
 * Implements hook_field_is_empty().
 */
function textf_field_is_empty($item, $field) {
   // If there's nothing in $item['textf'].
   if (empty($item['textf'])) {
        // Then we return 1, i.e. we say to Drupal that everything is fine).
        return TRUE;
        // And if it's empty, nothing will be displayed.
   }
}
We've just looked at the example of complementary module Field API in Drupal 7.
In fact, Field API seems to be a novelty in Drupal 7. Already existing modules might be more than enough for websites developing with not complex functionality (an e-mail field creation or the like). But once we aim at creating the new fields in the project - Field API is just what we need.